Hi There
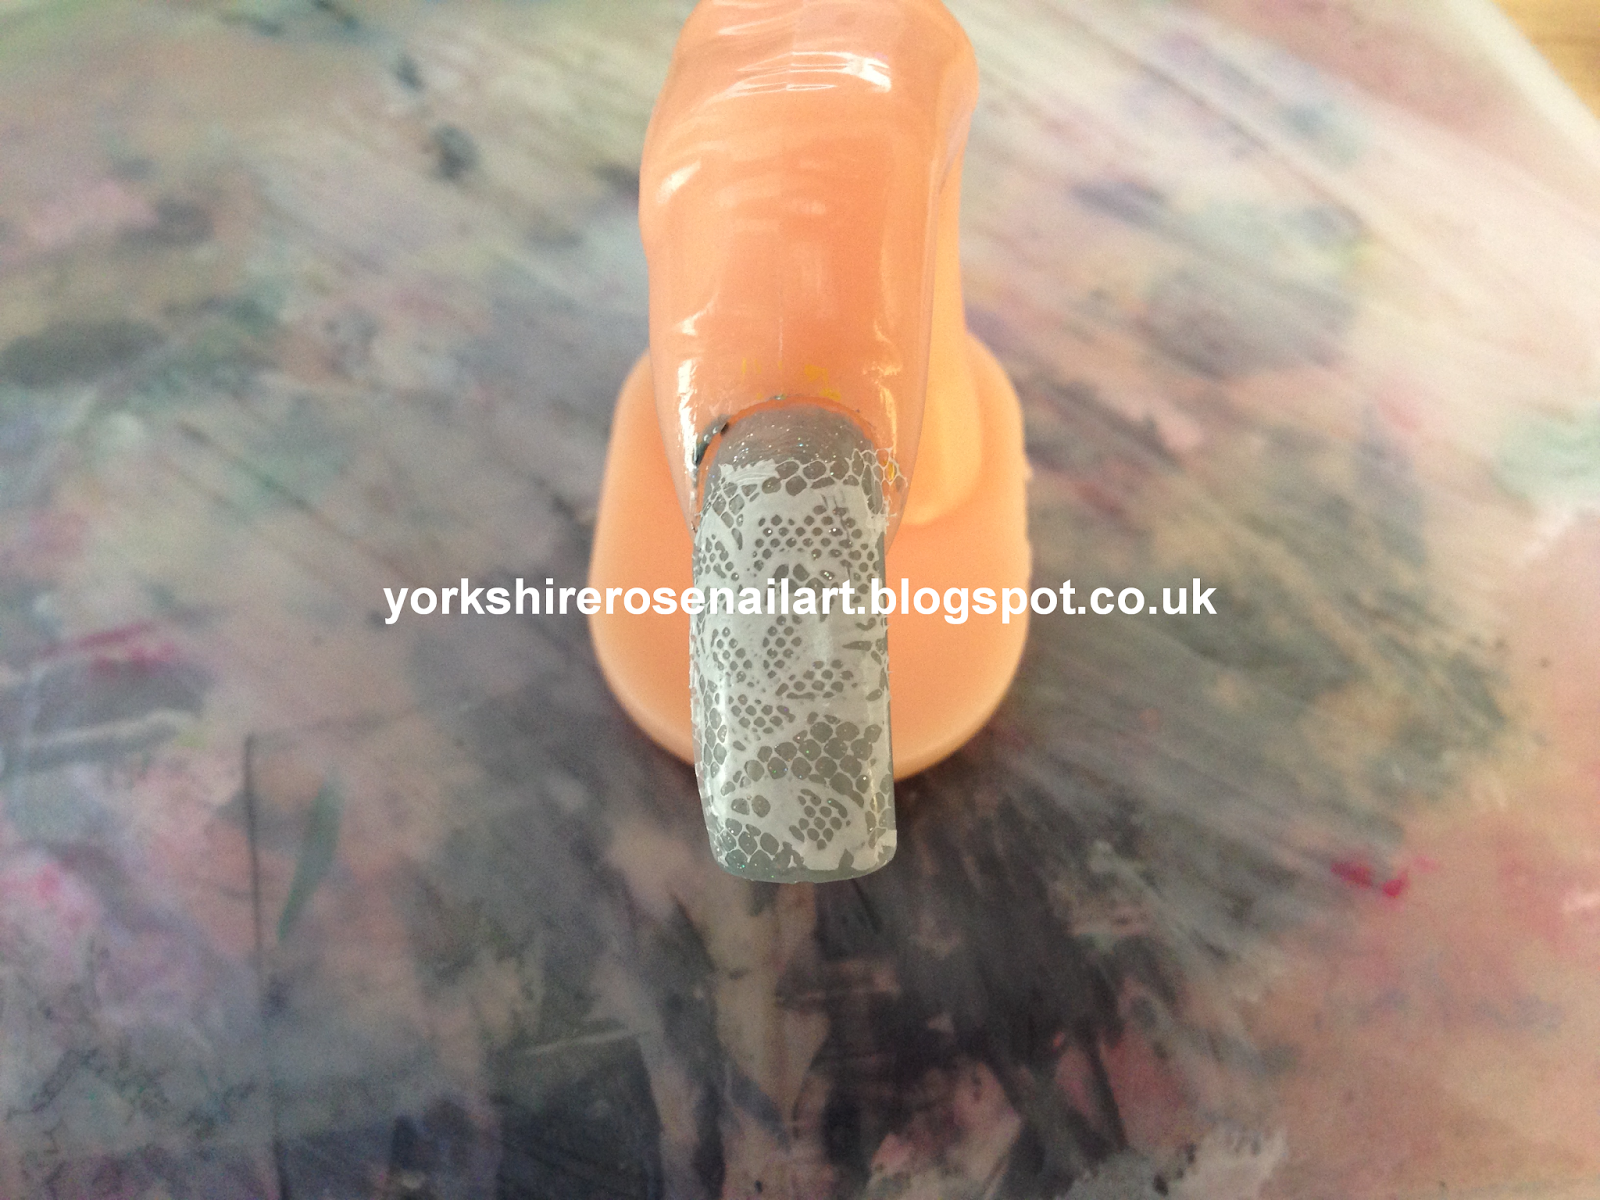
Today I received my new stamping plates from Fab Ur Nails, the one I am using was sent to me by Kelly Norris thank you Kelly for the lovely plates. I saw the image on this plate and thought it would look nice with gold foil underneath it.
Let's get started here are the materials I used
So from left to right as always Kiko black in 275, China Glaze Fast Track from the Hunger Games Collection, Nail Foil Adhesive (I got mine from dollar nail art when I made a purchase of 80 nail foils), Nail Foil (I got this particular foil from Wilkinson's) and Fab Ur Nails plate Fun 6
Here are the materials that I used that are optional
I used an LED gel lamp, Sensationail gel base and topcoat and Sensationail gel cleanser. I used these because I find that normal top coat wrinkles my foil and I have found that this doesn't happen with gel top coat. As I said above these are optional and if you don't have these it isn't a problem.
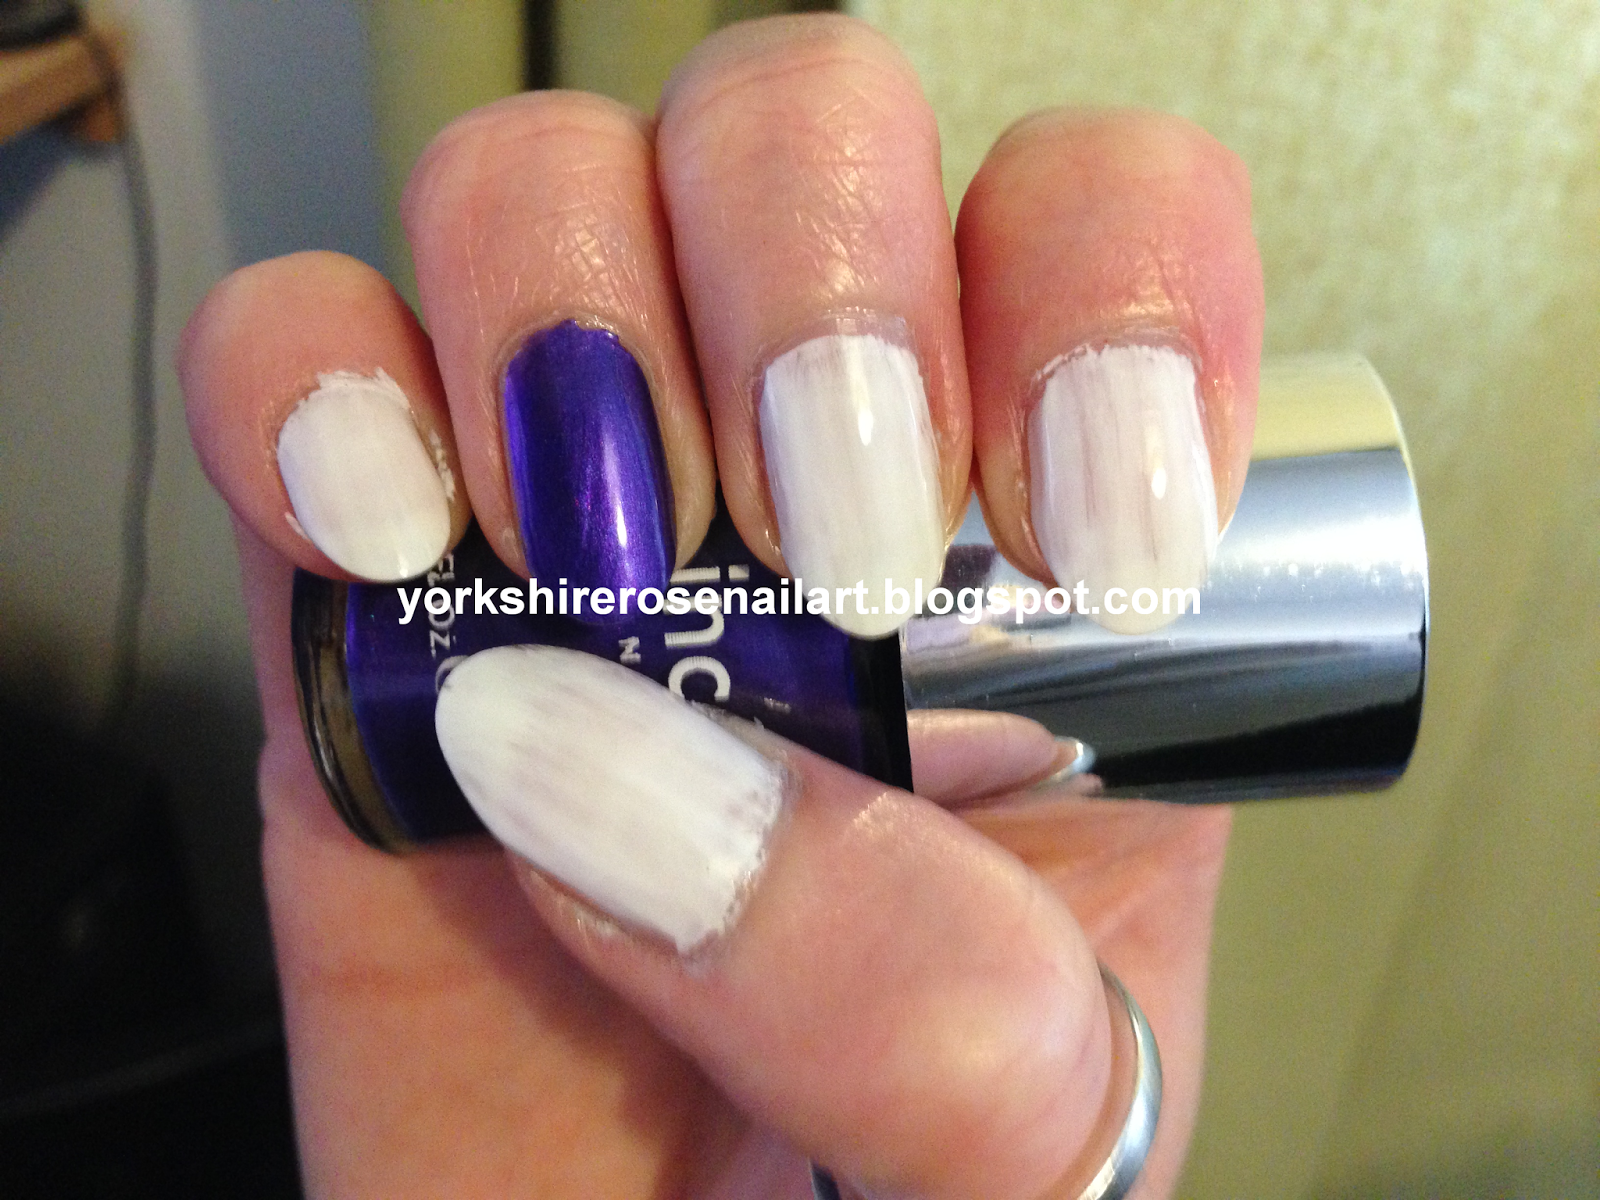
The first step was to paint all my nails with my base coat OPI Nail Envy Nail Strengthener and then I followed this with 2 coats of China Glaze Fast Track (this is just in case I miss a bit of foil you won't be able to see the bald patches as the nail colour below matches the foil)
Next I started with my thumb and put the nail foil glue all over my nail. The glue goes on as a milky blue colour and dries clear. Then I placed the foil over my nail and rubbed it with my finger and an orange wood stick and then pulled off the excess
Continue to do this with all your nails and they should look something like this
I have taken a blurred close up of the foil so you can see how sparkly it is
Next I stamped using plate Fun 6 from Fab Ur Nails and the image with 3 flowers on it I stamped the design on all of my fingers using Kiko Black 275
Here is the finished design
I really like this design but I did need to shrink the image so that it fit on my fingers as they are quite small. The image was ok on my thumbs as they are quite big.
I have to add that the foils are an essence product that I bought from Wilkinson's in the UK. It came with 2 patterns the design on my nails and the design on the image at the beginning of this post of the materials that I used. The package is graffiti look 03 hello holo
I hope you like the design
Thank you for reading
Yorkshire Rose xx
Saturday, 22 November 2014
Saturday, 8 November 2014
Nail Foils and Pearls
Hi There
Today I have received a set of 16 nail foils from Amazon and some nail pearls from Born Pretty Store and I thought I would test them out and make a post out of it. I have also received a nail plate from Born Pretty Store that I will test at a later date. Please note that all the things that I am testing were bought with my own money.
Let's get started
Here are the materials I used
As usual we'll go from left to right. Claire's Nail Foil Adhesive, Nail Foils from Amazon.co.uk, Kleancolor Clear polish, Nails Inc South Kensington, Sinful Colors Snow Me White, OPI Steady As She Rose, 1.5mm White Pearls from Born Pretty Store.com and an Orange Wood Stick.
Firstly I painted all my nails with a base coat I used my usual base coat OPI Nail Envy Strengthener. I then painted all my nails with 1 coat of Sinful Colors Snow Me White.
Next I painted my ring and middle fingers with 2 coats of Nails Inc South Kensington a foil effect polish and the rest of my nails I painted with 3 coats of OPI Steady As She Rose polish from the Pirates Of The Caribbean Collection. I needed 3 coats of Steady As She Rose polish to get full opaque coverage. I painted the nails I am going to put the foils on in a similar colour to the foil so if I miss any tiny spots they aren't as obvious.
Now we can start with the foil. I used Claire's Nail Foil Adhesive as you don't receive any with the foils. I put an even layer over all the ring finger nail. This will be white
When the Nail Foil Adhesive dries it dries clear
Although the Nail Foil Adhesive is dry it is very sticky, I now took a piece of nail foil and stuck it over my nail. I used an orange wood stick and rubbed this gently over my nail and around the edge of my nails. You should see the foil coming off the backing. When you have rubbed all over your nail grab the end of the foil and pull it off your nail quickly. If there are any bald spots just put the foils over the top an rub again with the orange wood stick and pull off quickly and this should fill in the gap.
This is what you should be left with
If you have read other nail blogs on foils you might have read that putting a top coat over the foils makes them crinkle. I find that putting a clear coat over the foil stops that from happening so I topped my foil with Kleancolor Clear Polish. I finally added my 1.5mm White Pearls to my little finger, index finger and thumb using my top coat as a glue and then topped them with another coat of top coat to seal them in , I used Nails Inc Kensington Caviar top coat
This is the finished design
Now it is time to give my opinion of the nail foils and 1.5mm white pearls. First the foil, I found them really easy to use unfortunately there was no nail glue with the product but for the price I wouldn't expect it. I love the design on the foils and the 16 foils I received were a collection of different designs although I did get a couple of duplicates. I would buy these again though. The white nail pearls are very pretty and easy to use and look really classy on my design (in my opinion). They were a good price and I have ordered more in different sizes.
Thank you for reading
Yorkshire Rose xx
Saturday, 1 November 2014
Haloween Nails
Hi There
Hope you all had an excellent Halloween and had lots of fun. I meant to post this mani yesterday but it totally slipped my mind (was watching Most Haunted and Ghost Adventures, Really was showing them all day yesterday) anyhow I forgot so I am posting it today. I hope you like it.
Here are the materials that I used
So from left to right we have China Glaze Meet Me Under The Stars, China Glaze Fairy Dust, OPI Do You Have This Colour In Stockholm, Kiko Black number 275, Sinful Colors Snow Me White, OPI I Just Can't Cope-A-Cabana, Avon Metallics Platinum Petal, OPI Can't Afjord Not To, Green acrylic paint, Bundle Monster plate H07, My Online Shop Plate MJXXV and My Online Shop plate MJHK.
I know there are alot of products here but it's worth it in the end.
Lets get started I prepared all my nails with one coat of base coat I used OPI Nail Envy Strengthener and then painted my ring finger with Sinful Colors Snow Me White and the rest of my fingers and thumb with Kiko Black 275
I then created a gradient effect on my ring finger using a cosmetic sponge and OPI I Just Can't Cope-A-Cabana, OPI Do You Have This Colour In Stockholm and OPI Can't Afjord Not To
Next I painted my little finger with China Glaze Meet me Under The Stars followed with a coat of China Glaze Fairy Dust. Meet Me Under The Stars is glittery but I wanted a bit more of the holographic effect with the Fairy Dust and in my opinion you can never have too much sparkle.
Now for the stamping part of this design. I took My Online Shop nail plate MJHK this is the plate with Hello Kitty on it and stamped this using Kiko Back 275. I then coloured her in using a very small dotting tool and Sinful Colors Snow Me White and Green Acrylic paint for her outfit and bow
When dry I stamped her over my gradient and then used My Online Shop plate MJXXV and Kiko Black 275 to put a city skyline below so it looked like she was flying
Finally I took Bundle Monster Stamping Plate BMH07 and Avon Metallic polish in Platinum Petal and stamped the writing onto my thumb.
This is the finished design
What do you think
Thank you for reading
Yorkshire Rose xx
Saturday, 18 October 2014
Lace & French Manicure
Hi There
I would like to apologise for my absence over the last few weeks. I have been ill, I'm still not 100% so my posts may be intermittent, please bare with me
Today I have done a lace and french manicure using a new plate that I received.
Let' get started. Here are the materials that I used
So from left to right OPI Bubble Bath, Sinful Colours Snow Me White,China Glaze Fairy Dust, Essie Parka Perfect and BBF plate 29.
Just so you know I wasn't going to post this design but I had so many people say how nice it was, I decided at the last moment that I would post it. Because of this I have had to use a fake finger and a fake nail to show you the steps I took to create the design, but the finished design is shown on my actual nails at the bottom of this post.
First I applied a base coat OPI Nail Envy Nail Strengthener on all my nails, I then painted my index, middle and little fingers with 2 coats of OPI Bubble Bath
Next I created a french tip to my index, middle and little fingers using Essie's Parka Perfect
To give them an extra bit of sparkle I added 1 coat of China Glaze Fairy dust to the tips. You can't see it very well on the picture but in person it really sparkles
Next I did my thumb and ring finger I painted them both with 2 coats of Essie's Parka Perfect
I then added 1 coat of China Glaze Fairy Dust to both nails, again the Fairy Dust isn't showing up that well on the picture but in person it really sparkles.
Now it's time to stamp. I took my BBF 29 plate and my Sinful Colors Snow Me White and stamped the lace image on the bottom right onto both my thumb and ring fingers
This is the finished design
What do you think
Thank you for reading
Yorkshire Rose xx
Saturday, 13 September 2014
Spotty Nail Stamping Using OPI Sheer Tints
Hi There
Today I decided to do an easy nail art design using my OPI Sheer Tints
Let get started
Here are the materials I used
I started by painting all my nails with OPI Nail Envy Nail Strengthener followed by 2 coats of Sinful colors Snow Me White polish. When dry I started adding my OPI Sheer Tints in different areas of the nail I started with I Can Teal You Like Me
I followed this by painting OPI Sheer Tints Don't Violet me Down diagonally to the first colour
I then painted OPI Sheer Tints Be Magentale With Me next to the blue (I Can Teal You Like Me)
Finally in the gap that I had left I filled with OPI Sheer Tints I'm Never Amberrassed. I know that the Sheer Tints are all top coats but I added OPI Rapid Dri Topcoat to bring all the colours together.
So now we have our base I took Kiko Nail Lacquer in Black and Dashica Big SdP-U plate and stamped the spotty design on all of my nails
This is the finished design
I really like this design
What do you think
Thank you for reading
Yorkshire Rose xx
Friday, 5 September 2014
Vodka & Red Bull Nails
Hi There
Next I did a gradient on all of my white nails (thumb, index finger, middle finger and little finger) using Sally Hansen Insta Dri in Brisk Blue and Sinful Colors Be Happy. to create the gradient I used a makeup sponge
I then stamped all my gradient nails with the Absolute Vodka Image on nail plate MJ XIV using Konad Special Polish in White. At this point it all sort of went wrong and I couldn't get the red bull image to show over the blue even though I was using Konad Special Polish in red so I had to change my accent nail a little bit. As the red bull can is blue and silver I painted my ring finger silver using Nails Inc Foil Effect polish in South Kensington
As the red bull can has blue on it as well as silver I did a French tip on my ring finger using Nails Inc in Belvedere Road
All that remains to be done now is all the Red Bull logo to my ring finger I did this using MJ XIV and Red Konad Special Polish
This is the finished design
What do you think
Thanks for reading
Yorkshire Rose xx
I posted a design a while ago for Jack Daniels and Coke nails. Alot of people have had a look at this so thank you for that. As it was popular I thought that I would follow this with Vodka and Red Bull nails. I hope you all like this design
Let's get started
Here are the materials that I used
So from left to right Sinful Colors Be Happy, Sally Hansen Insta Dri in Brisk Blue, Nails Inc Belvedere Road, Konad Special Polish Red, Konad Special Polish White, Nails Inc Foil Effect in South Kensington, It's not in the picture but I also used Sinful Colors Snow Me White. The plate is MJ XIV from My Online Shop.
To start I painted all of my nails with my base coat OPI Nail Envy Strengthener and then painted all my nails with Sinful Colors Snow Me White apart from the ring finger which I painted blue using Nails Inc Belvedere Road
I then stamped all my gradient nails with the Absolute Vodka Image on nail plate MJ XIV using Konad Special Polish in White. At this point it all sort of went wrong and I couldn't get the red bull image to show over the blue even though I was using Konad Special Polish in red so I had to change my accent nail a little bit. As the red bull can is blue and silver I painted my ring finger silver using Nails Inc Foil Effect polish in South Kensington
As the red bull can has blue on it as well as silver I did a French tip on my ring finger using Nails Inc in Belvedere Road
All that remains to be done now is all the Red Bull logo to my ring finger I did this using MJ XIV and Red Konad Special Polish
This is the finished design
What do you think
Thanks for reading
Yorkshire Rose xx
Sunday, 31 August 2014
Nail Decal Stamping
Hi There
Today I have used my nail plate and stamper to create a decal.
Here are the materials I have used
From left to right Ruby Wing colour changing polish in Dolled Up, Kiko Nail Lacquer in Black, China Glaze Tranzitions polish in Duplicity, Modify Me and Split-Perso-Nail-Ity, OPI Polish in Flamingo Tini Pink and You're Such A Budapest, Big SDP-B2 nail plate and a dotting tool.
I started by painting all my nails with my base coat OPI's Nail Envy Strengthener, and then painted my index finger and little finger in OPI's Flamingo Tini Pink and my thumb, middle and ring fingers in OPI's You're Such A Budapest
I the added 1 coat of Ruby Wing's colour changing polish in Dolled Up to my index and little fingers.
Next I prepared my decals I took my Big SDP-B2 plate and 3 stampers (so I could do all my stamping together) I stamped this pattern onto my stamper using Kiko Nail Lacquer in Black
I didn't want all of the design on my nail as I wanted to be able to see the beautiful bluey lilac colour of the OPI You're Such A Budapest underneath so I used a dotting tool to remove the part of the image that I didn't want and it ended up like this
Next I coloured in the image using China Glaze Tranzitions polishes in Spilt Perso-Nail-Ity, Modify Me and Duplicity using the smallest dotting tool I had the finished image looked like this
Don't worry if it looks a bit messy, just remember that this is the back of your decal. Alot of people use a topcoat to stick their decal to their nail. I have never done this because every time I did I smudged the image or the polish underneath and had to do the whole thing again. All I do is put pressure onto the stamper and roll slowly to make sure that the image has adhered to the nail. Also if you place the decal wrong you can just peel it off rather than removing all the hard work you have already done. So now I placed the decal onto my thumb, middle and ring fingers.
The above image shows the decal on my nails before clean up. If you didn't like there you had placed the decal you can remove it just by peeling it off and it won't mess up the polish below.
I then cleaned up the excess and this is the finished design
What do you think
Thank you for reading
Yorkshire Rose xx
Subscribe to:
Posts (Atom)


